
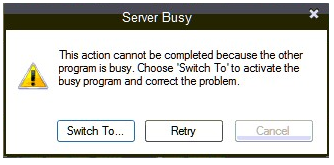
QuickBooks, a vital tool for managing financial operations, occasionally encounters errors that disrupt your workflow. QuickBooks Server Busy Error is one such issue that can leave you puzzled. When this error occurs, you’ll see a dialog box displaying the message: “QuickBooks Error: Server Busy: This action cannot be completed because the other program is busy.”
As QuickBooks Desktop is essential for your business operations and holds crucial financial data, resolving this error promptly is paramount. In this article, we’ll delve into the causes of QuickBooks Server Busy Error and guide you on how to fix it.
Understanding QuickBooks Server Busy Error
Before we dive into the solution, let’s gain a deeper understanding of QuickBooks Server Busy Error:
What is a QuickBooks Server Busy Error?
The QuickBooks Server Busy Error occurs when QuickBooks Desktop faces difficulties while trying to exchange data. It usually means that someone else is currently using the same company file, causing communication problems with the server that QuickBooks relies on. This error message can interrupt your work and requires prompt action to resolve.
Causes of QuickBooks Server Busy Error
Several factors can trigger the QuickBooks Server Busy Error. Here’s a closer look at what might be causing it:
- Concurrent program usage – Another program requiring user input is attempting to work with QuickBooks Desktop simultaneously. This simultaneous usage can lead to conflicts and trigger the error.
- Windows update running in the background – When Windows Update is running in the background, it can create issues for QuickBooks Desktop. The active Windows Update process can disrupt the functioning of QuickBooks, leading to the occurrence of the Server Busy Error.
- Improper shutdown of QuickBooks – When QuickBooks Desktop or some of its parts weren’t shut down properly during the previous session, it can cause problems. This incorrect shutdown can leave behind processes that clash with upcoming QuickBooks operations.
- Multiple computers hosting QuickBooks company files – Having multiple computers configured to host QuickBooks company files can cause conflicts. The competition for accessing these company files can result in the Server Busy Error being triggered.
- Security software or firewall blocks – Software security applications or personal firewalls can block QuickBooks Desktop updates. This blockage prevents QuickBooks from accessing necessary updates and can lead to errors.
How to Fix QuickBooks Server Busy Error Message?
QuickBooks, the cornerstone of many businesses for financial management, occasionally throws a curveball with the dreaded QuickBooks Server Busy Error. When this error crops up, you’ll be greeted by a message saying, “QuickBooks Error: Server Busy: This action cannot be completed because the other program is busy.” Since QuickBooks holds crucial business information, resolving this issue promptly is essential.
Let’s dive into a step-by-step guide to tackle the QuickBooks Server Busy Error, ensuring your financial operations run smoothly.
1 – Shutdown all open programs
Cause – Sometimes, open programs with dialog boxes can trigger the Server Busy Error.
- Ensure no open program has unresolved dialog boxes.
- Applications such as Norton, Windows Defender, Google Desktop, Vista Security, and Pivot Software Control might be responsible for the issue.
- If using selective startup in Windows, halt IntuitFCS.
- Consider disabling QuickBooks Desktop temporarily in Webroot Spy Sweeper’s gamer mode.
2 – Update Windows
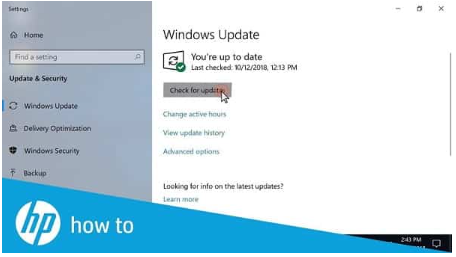
Cause – Outdated Windows can interfere with QuickBooks.
- Check for Windows updates and install any pending updates.
- Restart your computer and check if QuickBooks works smoothly.
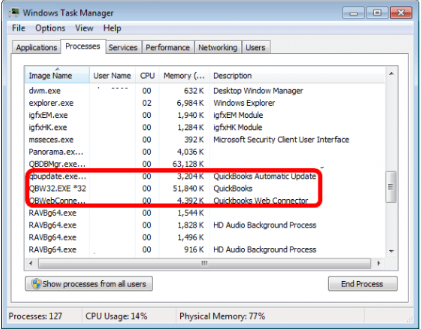
3 – Check and close QuickBooks Desktop components
Cause – Lingering QuickBooks processes can lead to errors.
- Close your QuickBooks data file and exit QuickBooks Desktop.
- Access the Windows taskbar and open Task Manager.
- Under “Processes,” end each QuickBooks-related process.
- Restart QuickBooks Desktop and reopen your data file.
4 – Remove QuickBooks update agent
Cause – The QuickBooks Update Agent might be causing the “Server Busy” error.
- Navigate to the Windows or Start menu.
- Open “All Programs” and go to the “Startup” tab.
- Right-click on QuickBooks Update Agent and select “Delete.”
- Close all shared updates in QuickBooks Desktop.
- Go to the Help tab, select “Update QuickBooks,” and choose “Options.”
- Click on “Share Download” and select “No,” then close.
- Run reboot.bat file.
- Repair QuickBooks Desktop or reinstall using a clean install.
Additional Tips – For Intuit Pro-Series users
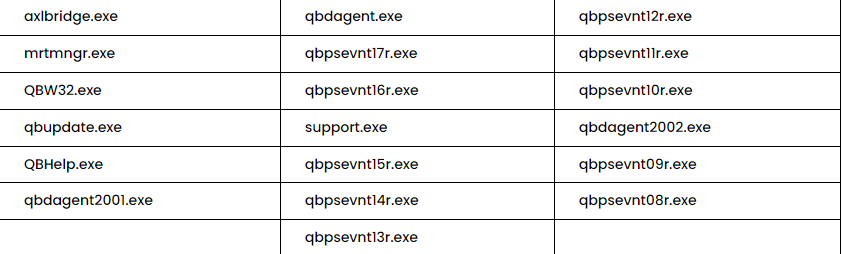
- Check Windows Task Manager for QbpsevntXXr.exe (XX is the year of your software).
- Rename qbpsevntXXr.exe by adding “.old” at the end (e.g., qbpsevnt18r.exe.old) in the Intuit ProSeries folder.
- If issues persist, consider seeking professional help.
Other troubleshooting steps –
- Boot Windows to Safe Mode with Networking, start QuickBooks Desktop and then restart Windows in Normal Mode.
- Run QuickBooks Desktop in Windows Selective Startup or Windows Safe Mode.
- If using QuickBooks Desktop on a network, restart the machine and reconnect to mapped drives.
- Check for backup or mirroring software on the server or network that might interfere.
- If security software is installed, disable it or add .DOC files to the exception list.
- Consult the security software’s documentation for guidance.
By following these steps and tips, you can navigate your way through the QuickBooks Server Busy Error, ensuring a seamless financial management experience.
5 – Clean install QuickBooks Desktop
If the previous troubleshooting steps haven’t resolved the issue, you can opt for a clean reinstall of QuickBooks Desktop. Follow these steps:
- Open Windows Task Manager and identify qbpsevntXXr.exe (XX signifies the Intuit ProSeries software’s year) and make a note of the year in the file name.
- Open Windows Explorer.
- Navigate to the Intuit ProSeries folder (typically C:\ ProWinXX) for that specific year.
- Go into the 32-bit folder.
- Locate the qbpsevntXXr.exe file, right-click on it, and select “Rename.”
- Add “.old” to the end of the file name (e.g., qbpsevnt18r.exe.old).
- Close Windows Explorer.
6 – Quick Fix My Program
Quick Fix My Program tool can be your ticket to permanently eliminate the Server Busy issue. Follow these steps:
- Download and install QuickBooks Tool Hub.
- Save the downloaded file where you can easily access it.
- Double-click the downloaded file to install and agree to the terms and conditions.
- Launch the QuickBooks Tool Hub by double-clicking its icon.
- Click on “Program Problems.”
- Select “Quick Fix My Program.”
- Open QuickBooks and access your company file.
7 – Disable Automatic Updates in QuickBooks
Follow these steps to disable automatic updates in QuickBooks:
- Press Ctrl + Alt + Delete.
- Select “Task Manager” and go to the “Startup” tab.
- Locate “QuickBooks Automatic Update” and choose “Disable.”
- Turn off shared updates in QuickBooks.
- Go to the Help menu, click on “Update QuickBooks,” and select “Options.”
- Choose the “Share Download” option.
- Close the process by clicking “Close.”
8 – Running reboot.bat File
- Close QuickBooks.
- Right-click the QuickBooks Desktop icon and select “Properties,” then click on “Open File Location.”
- Select the shortcut from the properties menu.
- Right-click the reboot.bat file.
- Choose “Run as administrator.”
- A command window will appear; do not manually close it.
9 – Using Safe Mode
- Switch to Safe Mode with Networking.
- Open QuickBooks.
- Reboot Windows in normal mode.
- Launch QuickBooks Desktop and carry out tasks while in either Windows Selective Startup or Safe Mode.
- Reboot the system and reconnect to mapped drives.
- Check if backup or mirroring software is actively scanning the hard drive and blocking QuickBooks access. Temporarily disable the software
10 – Map the Network Drive in Windows
- Navigate to the Start menu.
- Enter “This PC” and press Enter.
- Double-click “This PC.”
- Choose “Map a network drive.”
- Assign a drive letter.
- Click “Browse” to locate your QuickBooks files.
- Click “OK” and then “Finish.”
- Use the newly mapped drive to access your company files.
You May Read Also: How to Resolve QuickBooks Payroll Error Code 15223?
We hope that these troubleshooting steps have helped you resolve the QuickBooks Server Busy Error. If you still encounter issues or have doubts, feel free to seek assistance from our QuickBooks toll-free support number. Your financial management will be back on track in no time!
Frequently Asked Questions
What is QuickBooks Server Busy Error, and why does it occur?
QuickBooks Server Busy Error occurs when QuickBooks Desktop faces difficulty completing a data exchange process. It typically happens when another user is actively using the same company file, leading to communication issues with the application server.
How can I prevent the QuickBooks Server Busy Error from happening in the first place?
To prevent the Server Busy Error, make sure no open program has unresolved dialog boxes, disable conflicting background programs (e.g., security software), and ensure proper shutdown of QuickBooks. Additionally, consider timely updates and maintenance.
Can I resolve the Server Busy Error on my own, or should I seek professional help?
Yes, a clean reinstall of QuickBooks Desktop is generally safe and can resolve various errors, including the Server Busy Error. Ensure you have a backup of your company files before proceeding.
Can I resolve the Server Busy Error on my own, or should I seek professional help?
You can attempt to resolve the error independently by following troubleshooting steps. However, if the issue persists or you’re unsure about the solution, it’s advisable to consult a QuickBooks expert or IT professional.
What is the Quick Fix My Program tool, and how does it work?
Quick Fix My Program is a tool within QuickBooks Tool Hub designed to fix common program-related issues. It automatically detects and repairs problems to eliminate errors like Server Busy.
Are there any risks associated with disabling automatic updates in QuickBooks?
Disabling automatic updates in QuickBooks may prevent important security and feature updates. It’s generally safe to do so temporarily for troubleshooting, but it’s recommended to re-enable updates once the issue is resolved.
What should I do if I encounter the Server Busy Error while working on a network with multiple users?
If you encounter the error in a multi-user network setup, ensure all users are logged out, restart the server, and reconnect to mapped drives. Additionally, check for software conflicts and consider contacting your network administrator.