
In the realm of business operations, the importance of preserving vital information encompassed within invoices or bills cannot be overstated. Whether it’s for meticulous accounting or navigating the intricacies of taxation, the need to safeguard these details is paramount. QuickBooks, with its versatile import options, offers a seamless solution for managing invoices effectively. This article unveils the pragmatic methods to import invoices into QuickBooks Enterprise, highlighting the convenience and flexibility the process offers.
How to Import Invoices into QuickBooks Enterprise?
When it comes to importing invoices, QuickBooks Enterprise provides users with a range of options to suit their preferences and requirements. The software allows for a variety of formats, including IIF, CSV, and Excel files, ensuring a user-friendly experience for diverse needs.
- IIF format for swift import – The IIF format is a fast and efficient way to import invoices into QuickBooks Enterprise, ensuring accurate and time-saving invoice data transfer.
- CSV and Excel files for versatility – For those who prefer the flexibility of CSV or Excel formats, QuickBooks Enterprise accommodates these options as well. This versatility empowers users to choose the method that aligns best with their existing processes.
Guided steps to import invoices into QuickBooks Enterprise – To facilitate a smooth import process, follow these user-friendly steps within QuickBooks Enterprise:
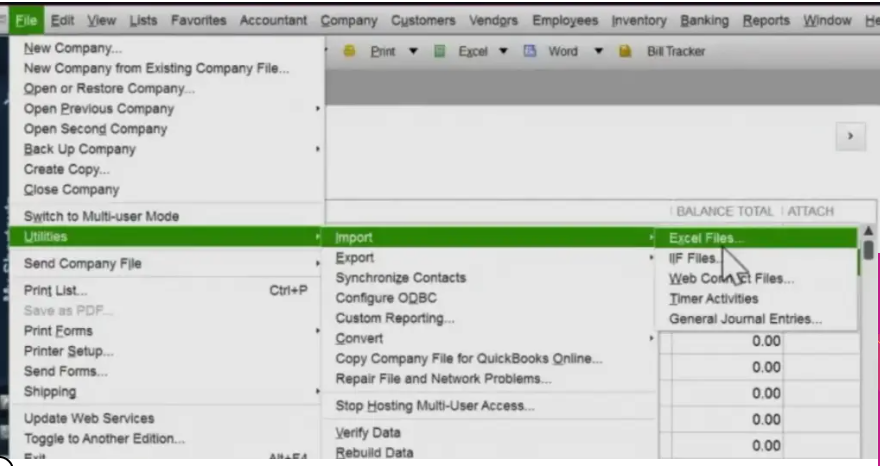
- Begin by navigating to the “Utilities” section within the “File” menu. This is where the journey to importing invoices takes off.
- In the dropdown menu, locate and select the “Import” option. This step is pivotal to import invoices into QuickBooks.
- Depending on your preference, choose the “Excel Files” option. Alternatively, if the need arises, the CSV format can also be selected for import purposes.
- Should you choose not to include or modify batch entries, simply tap on “No” to streamline the process.
- QuickBooks Enterprise will then provide clear and concise on-screen instructions. Adhering to these steps ensures that the import process progresses smoothly.
- It’s important to specify the data type during the process. This accuracy-focused step contributes to an error-free import.
- Once the process concludes, QuickBooks Enterprise opens up the imported Excel spreadsheet with impeccable formatting. This allows you to review the imported data
Can I Import Invoices into QuickBooks Desktop?
Navigating the intricacies of business finances requires a seamless approach to managing invoices. QuickBooks Desktop offers versatile solutions, enabling you to import invoices with ease. This article delves into two user-friendly methods to import invoices into QuickBooks Desktop, empowering you with the tools you need for efficient financial management.
Simplified import options for QuickBooks Desktop – QuickBooks Desktop offers multiple import options, ensuring that you can choose the method that aligns perfectly with your workflow and preferences. Whether you opt for the IIF format or the CSV format, importing invoices has never been more straightforward.
Method 1 – Harnessing the power of IIF files
The IIF (Intuit Interchange Format) file is a powerful tool to import invoices into QuickBooks Desktop. Here’s how you can utilize it:
- Gather all the invoice information and encapsulate it within the IIF file.
- Open the specific company file you want to import the invoices into.
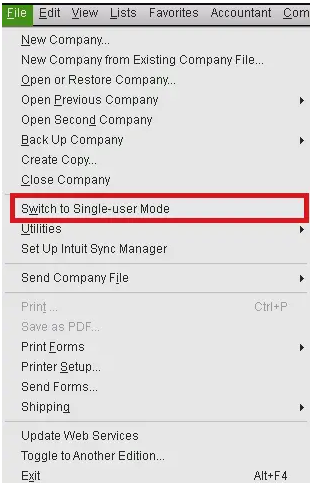
- Navigate to the “File” menu and select “Switch to Single-User Mode.” This optimizes the environment for seamless import.
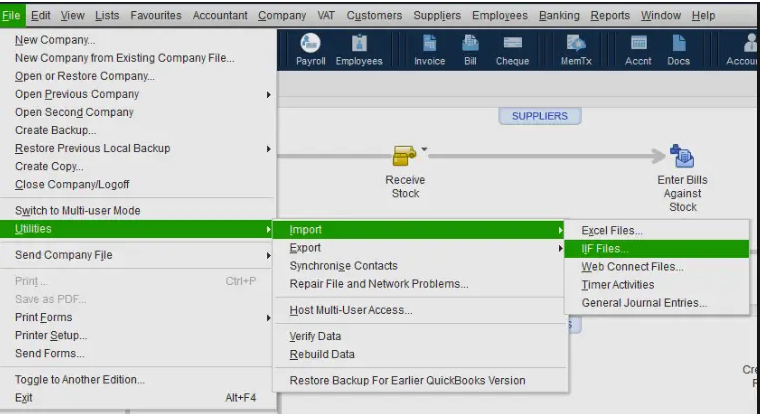
- Head to the “Utilities” section within the “File” menu. Click on “Import” to kickstart the process.
- Opt for “IIF Files” from the available options.
- Locate your prepared IIF file and click “Open” to initiate the import process.
- Confirm the action by selecting “Ok.”
- If the software doesn’t support the IIF format, you can use an online file converter to adapt the format to a supported one.
Method 2 – Seamlessly import via CSV format
If you prefer the versatility of CSV format, QuickBooks Desktop has you covered –
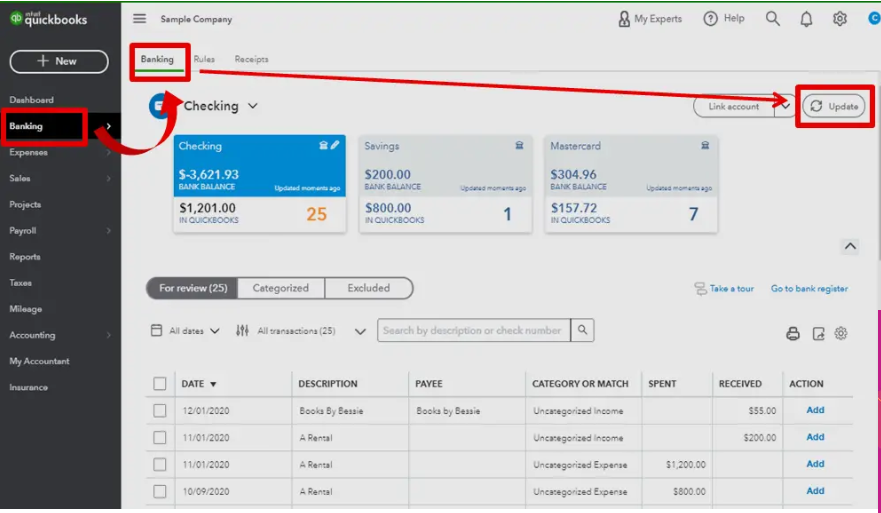
- Open the “Banking” tab within the software.
- Tap on “Update,” a crucial step to prepare for the import.
- Choose between “File to Upload” or “File Upload” based on your requirements. Opt for the “.CSV” format.
- From the dropdown menu, select the appropriate “QuickBooks Account.”
- Map the fields within the CSV file as per the chosen format.
- Proceed by selecting “Next” and follow the prompts. Upon receiving a notification, confirm by clicking “Yes.”
- Conclude the import process by clicking “Finish.”
Can You Import Invoices into QuickBooks Online?
Efficiently managing your business’s financial data is paramount, and QuickBooks Online offers streamlined solutions for importing invoices. This article presents two user-friendly methods that allow you to effortlessly import invoices into QuickBooks Online. Discover the power of the Import Invoices Wizard and the convenience of Excel Transactions, both designed to simplify your financial management.
Simplified methods to import invoices into QuickBooks Online – QuickBooks Online equips you with versatile methods to import invoices, ensuring a seamless experience. Whether you’re leveraging the Import Invoices Wizard or Excel Transactions, the process is straightforward and user-friendly.
Method 1 – Harnessing the import invoices wizard
The Import Invoices Wizard is a powerful tool that guides you through the process of importing invoices into QuickBooks Online:
- Begin by logging into your QuickBooks Online account, ensuring you have the necessary credentials.
- Click on the “File” menu, which holds the key to a range of essential functionalities.
- Within the “File” menu, locate and select “Utilities.” This step is pivotal to initiate the import process.
- Within the “Utilities” section, find and click on the “Import” button. This action opens the “QuickBooks Import Invoices” window, setting the stage for your import.
- From the available options, choose “Excel Files.” This choice aligns with the method you’re using to import your invoices.
- Select “Advance Import” and then pick the Excel file containing the invoices you intend to import.
- Open the “Preferences” option. Here, you can specify how you want QuickBooks Online to manage duplicate data or errors, ensuring accuracy throughout the process.
- Click “Preview” to get a glimpse of the invoices or bills that will be imported. Once you’re satisfied, press “Ok” to confirm your selection.
Method 2 – Swift import with excel transactions
Excel Transactions is an efficient application that streamlines the import of various files, including invoices, into QuickBooks Online:
- Launch Excel Transactions and locate the “Upload File” menu, which is your gateway to streamlined imports.
- Locate the spreadsheet that holds the invoices you wish to import. Click on it to initiate the process.
- Choose “QuickBooks Entity” as “Invoices.” This ensures that the software understands the nature of the data you’re importing.
- Align the column headers in your spreadsheet with the appropriate “Invoice Fields” within QuickBooks Online.
- With everything mapped correctly, click the “Import” button to kickstart the seamless import of your invoices.
How to Import Invoices into QuickBooks in a Batch?
Effectively managing a multitude of invoices demands an efficient approach, and QuickBooks offers the Batch Actions feature to simplify this task. This article presents step-by-step instructions on how to seamlessly import invoices into QuickBooks in a batch, ensuring a streamlined financial management experience. Learn how to utilize this feature in both QuickBooks and QuickBooks Online, unlocking a new level of efficiency in your invoice management.
Simplified batch invoice import methods – QuickBooks empowers users with versatile features for managing multiple invoices simultaneously. Whether you’re working within QuickBooks or QuickBooks Online, these methods offer clear steps to streamline the import process.
Method 1 Harnessing the power of batch actions
The Batch Actions feature within QuickBooks simplifies the import of multiple invoices in one go:
- Begin by navigating to the “Sales” section within QuickBooks, where the Batch Actions feature resides.
- Click on “All Sales” to explore all your sales transactions, including invoices.
- Identify the invoices you want to import by selecting the relevant checkboxes. You can choose to either print or email these invoices.
- Click on the “Batch Actions” button, a powerful tool that initiates the process of importing multiple invoices together.
- QuickBooks will guide you through the process of importing invoices in a batch. Simply follow the instructions to ensure a seamless import.
Method 2 QuickBooks online approach for batch import
For QuickBooks Online users, the settings offer an effective solution for batch importing of invoices:
- Organize your invoice data in a spreadsheet, arranging columns based on the necessary information such as customer, invoice number, date, item amount, due date, and item tax code.
- Open the “Settings” section within QuickBooks Online and navigate to “Accounts and Settings.”
- Click on the “Sales” tab and then select “Edit” under the “Sales Form Content” section.
- Enable the “Custom Transaction Numbers” feature to facilitate the smooth import of your invoice data.
- Within the “Settings” section, click on “Import Data,” followed by “Invoices.” Attach your prepared spreadsheet by browsing and selecting it.
- Map the fields from your spreadsheet to the corresponding fields within QuickBooks Online. This step ensures accurate data alignment.
- Specify a date format for consistency.
- Choose either “Inclusive” or “Exclusive” for taxes, based on your requirements.
- Click “Next” and then “Start Import” to initiate the batch invoice import process.
Whether you’re dealing with a single bill or an array of invoices, QuickBooks offers a seamless solution. Across its various versions, QuickBooks provides the flexibility to upload your data, adapting to the file format and methods that best suit your needs.
You May Read More: How do I Delete Inventory Items in QuickBooks Online?
Frequently Asked Questions
How can I import PDF invoices into QuickBooks?
While there isn’t a direct feature to import PDF invoices, you can rely on third-party tools that support the PDF format. These tools can assist you in seamlessly importing PDF invoices into QuickBooks.
What’s the procedure for importing invoices into QuickBooks online?
QuickBooks Online offers multiple methods for importing invoices. You can choose to import invoices with or without utilizing the Excel Transactions program, catering to your preferred workflow.
Is bulk invoice import possible in QuickBooks Desktop?
QuickBooks supports bulk import for invoices. If you’re dealing with multiple invoices, QuickBooks enables you to upload several files concurrently. To achieve this, you need to create a spreadsheet, enable transaction numbers, and then upload the prepared spreadsheet to initiate the import.
How do I upload invoices into QuickBooks?
To upload invoices, start by clicking on the “File” tab. Within this menu, you’ll find a straightforward “Import” option. Choose the “.IIF” file format to proceed. As the import process concludes, your invoices will be successfully uploaded.
How Can I import bills from excel into QuickBooks desktop and online?
For QuickBooks Online, the Import Invoices Wizard proves invaluable. Create an Excel file to store your bill or invoice data, then utilize the wizard to upload and import the information seamlessly. On the other hand, QuickBooks Desktop requires an IIF file for this purpose.