
Welcome to our comprehensive guide on setting up QuickBooks credit card payments. In this article, we’ll walk you through the process in a professional and friendly tone, ensuring clarity and conciseness while highlighting the key steps to receive credit card payments in QuickBooks. Whether you’re using QuickBooks Online or QuickBooks Desktop, we’ve got you covered.
Setting up QuickBooks credit card payments
Follow these steps to set up for receiving credit card payments in quickbooks online
1 – Accessing account settings
- Log in to your QuickBooks Online account.
- Click on the gear icon located in the top right corner.
- From the dropdown menu, select “Account and Settings.”
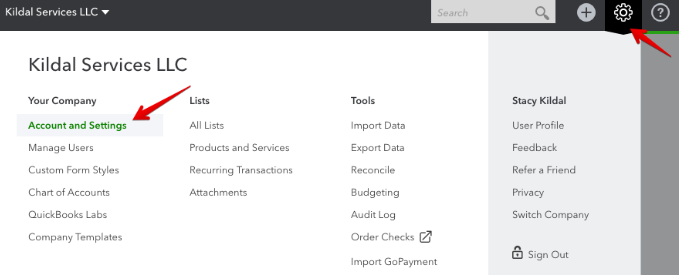
- Navigate to the Payments tab on the left navigation bar.
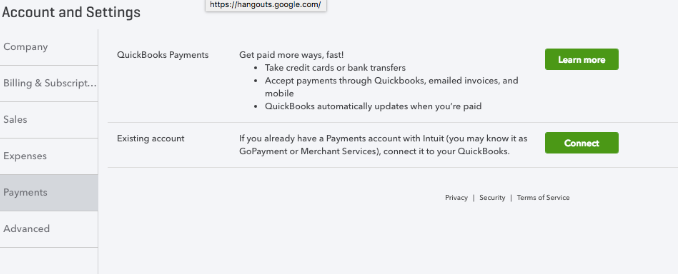
2 – Rates and fees
- QuickBooks offers competitive rates for credit card payments. It’s important to note that if your customers opt for bank transfers, there will be no QuickBooks Credit Card Payments fee.
3 – Business information
- Enter your business details. Ensure accuracy to facilitate smooth transactions.
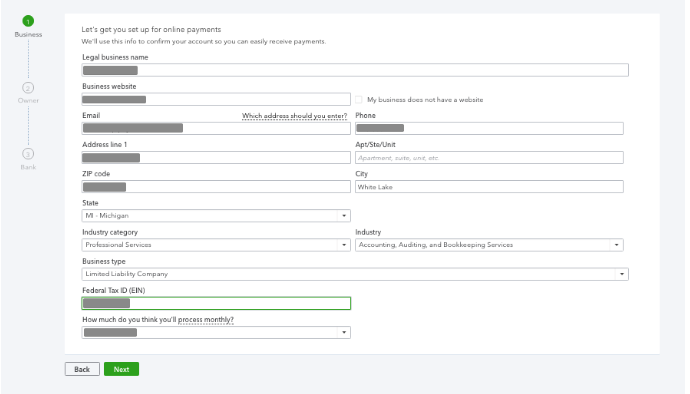
- Provide information about the owner or principal of your business. This helps in verifying your business identity.

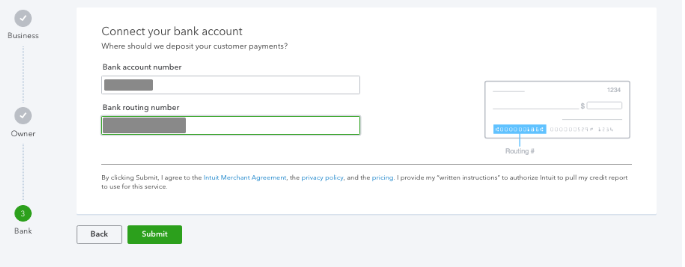
4 – Bank information
- Enter your business bank information. This is crucial for depositing payments directly into your account.
5 – Application approval
- After submitting your information, QuickBooks will review your application. You can expect a prompt response.
6 – Notification
- If your application is approved, QuickBooks Credit Card Payments will be accessible in approximately 24 hours. You’ll be ready to start accepting credit card payments seamlessly.
7 – If not approved
- In the event that your application is not approved, don’t worry. You can reach out to QuickBooks support to inquire about the reasons behind the decision. Remember that it may not be solely credit-related; it could be due to industry-specific restrictions.
Setting up QuickBooks credit card payments is a straightforward process that can significantly streamline your payment transactions. Whether you’re running a small business or managing a larger enterprise, this feature can enhance your financial management capabilities. By following these steps, you’ll be well on your way to receiving credit card payments efficiently within QuickBooks.
Managing Your QuickBooks Credit Card Payments
Are you looking to simplify credit card payments and invoicing for your business? QuickBooks Credit Card Payments can be your go-to solution. In this comprehensive guide, we’ll walk you through the process of setting up and managing your QuickBooks Credit Card Payments account, creating transactions, and ensuring a seamless experience for both you and your customers.
Setting up your QuickBooks credit card payments account – Once your QuickBooks Credit Card Payments account is approved, follow these steps to get started –
- Click on the gear icon in your QuickBooks Online account.
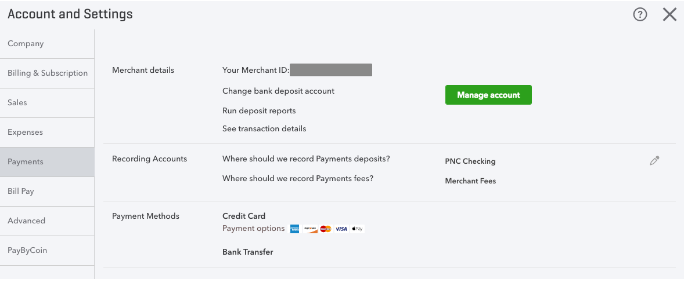
- Choose “Account and Settings” and click on the “Payments” tab.
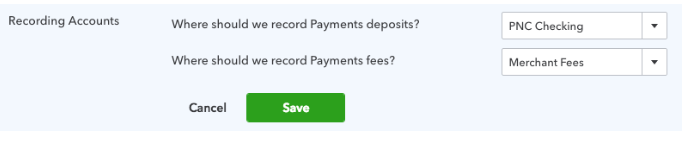
- Select the bank account from your QuickBooks Online chart of accounts where you want deposits to be posted.
- Specify the expense account for merchant fees.
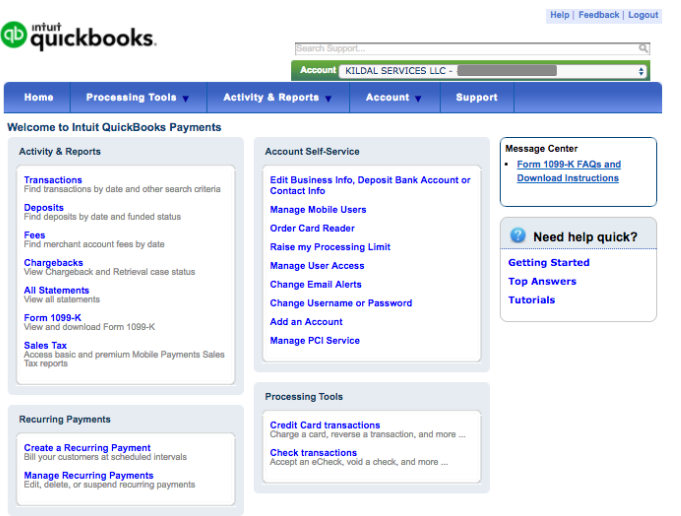
- To review transaction history or adjust settings, click the “Manage Account” button. This will take you to the merchantcenter.intuit.com page.
- On the merchantcenter.intuit.com page, you can review transaction history, manage mobile-only users, set alert preferences, access help and resources and change the bank account if needed.
Creating transactions with QuickBooks credit card payments – Now that your QuickBooks Credit Card Payments are ready, let’s delve into creating transactions. We’ll start with sending invoices –
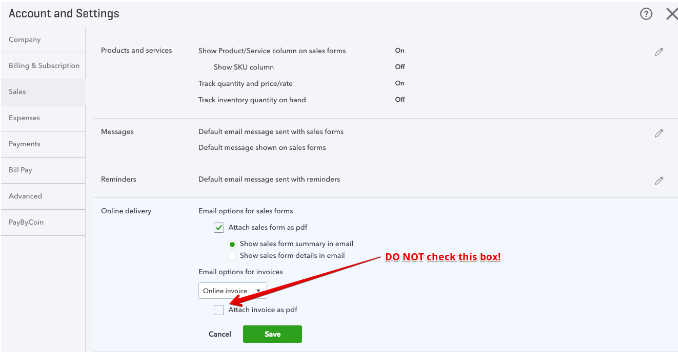
- Click the gear icon, go to “Account and Settings,” and select the “Sales” tab.
- Under “Online delivery,” ensure that the “Attach invoice as PDF” checkbox is unchecked. This allows recipients to view the invoice in the online invoice portal.
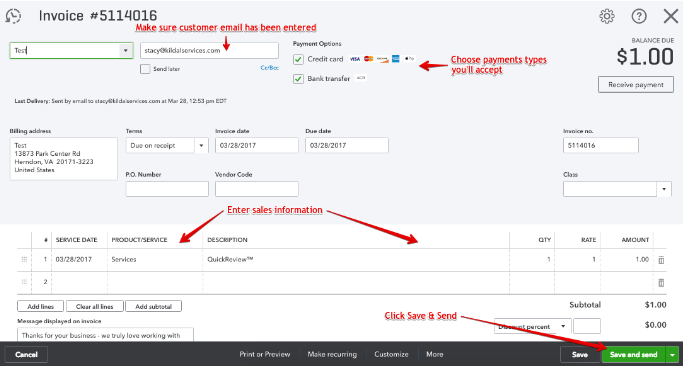
- Click the Quick Create button (represented by a plus sign) in the top right corner and choose “Invoices.”
- Fill out the invoice as usual, specifying the types of online payment options you accept.
- Click “Save and send” in the bottom right corner.
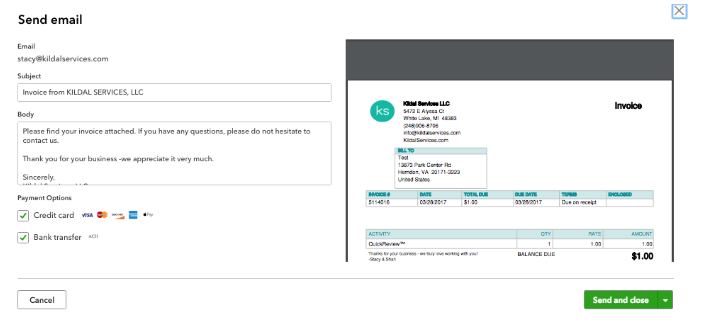
- On the next screen, you can modify the subject line and email content.
- Make any necessary changes to payment options.
- Click “Send and close” when everything looks good.
Customer experience in the online invoice portal – After you send the invoice, your customers will receive an email without the attached PDF invoice. Instead, they’ll find a button to view the invoice. Here’s what happens next:
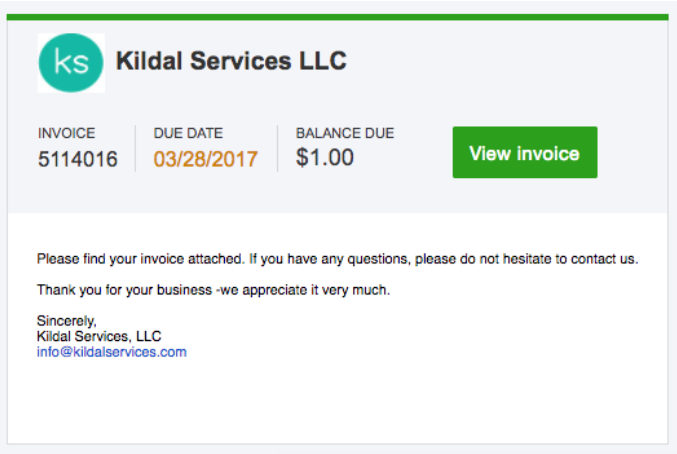
- When customers click “View Invoice,” they are directed to the Online Invoice Portal.
- From here, they can print, save the invoice as a PDF, and proceed to pay.
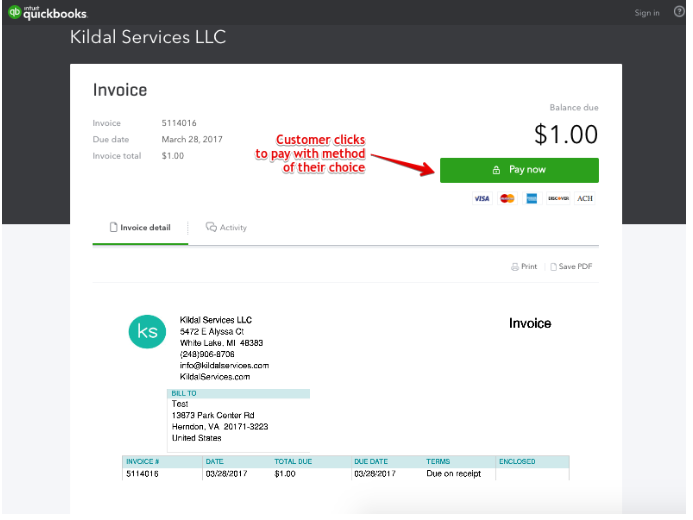
- By clicking “Pay Now,” customers select their preferred payment method and enter the required information.
- They can also create an account to save payment details for future transactions.
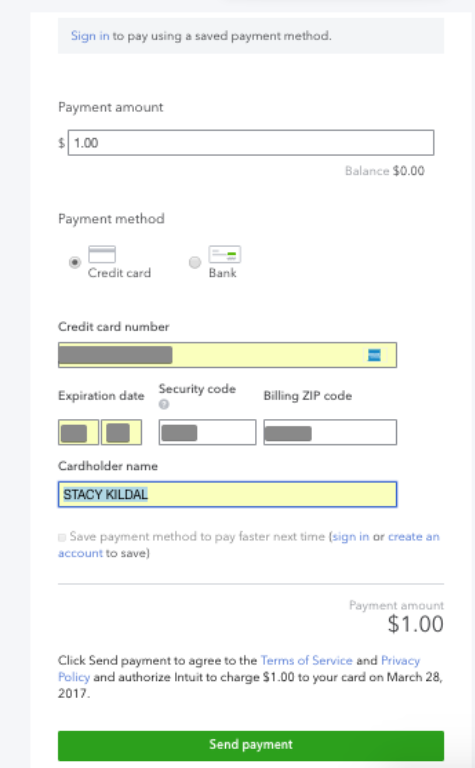
- After clicking “Send payment,” customers receive on-screen confirmation, and the Online Invoice Portal displays a paid status.
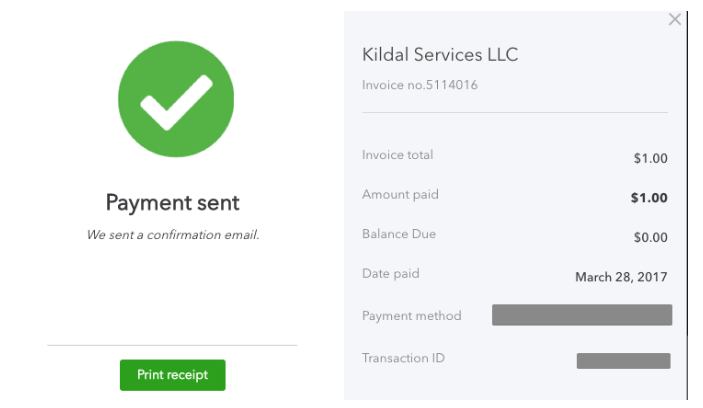
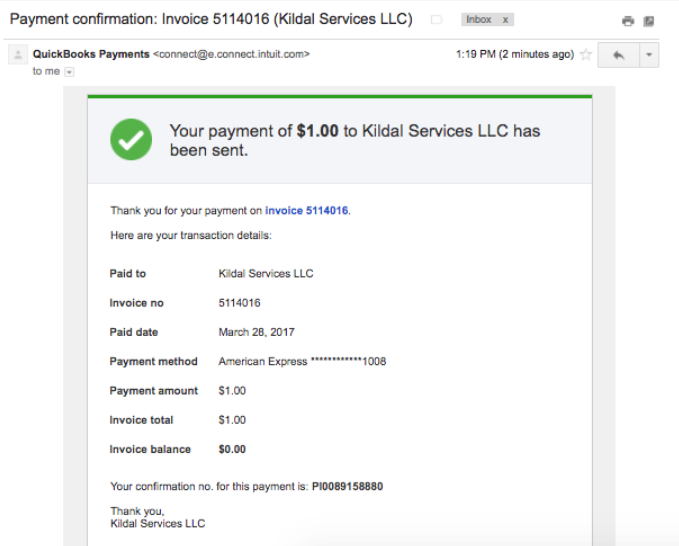
- They also receive an email with payment confirmation and a link to the invoice in the Online Invoice Portal.

Seamless management in QuickBooks online – Your role isn’t over once the invoice is sent; QuickBooks Credit Card Payments automates the rest –
- You’ll receive an email notifying you of the payment.
- In QuickBooks Online, the invoice now shows a paid status with a link to the payment.
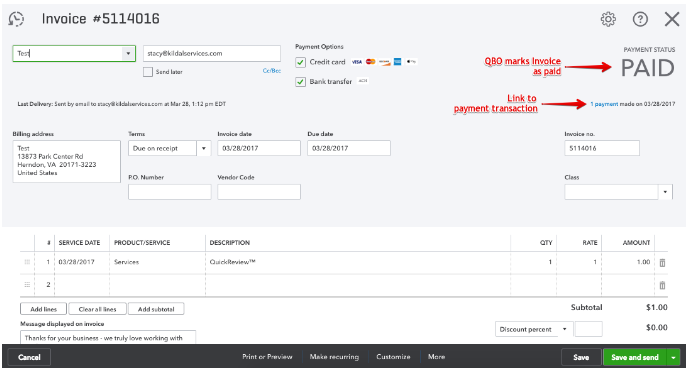
- Clicking the link from the invoice reveals the transaction details, including the date, amount, and that the payment was processed via QuickBooks Credit Card Payments.
Managing Your QuickBooks Credit Card Payments
- QuickBooks Credit Card Payments handles deposit entries for you.
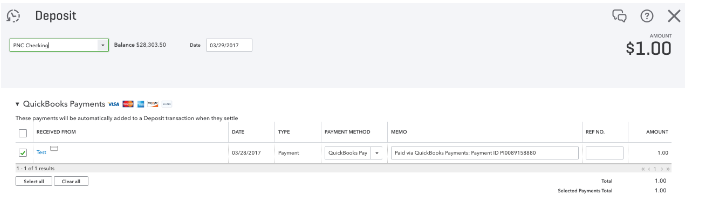
- If the customer pays with a credit card, it also records the merchant fee transaction.

QuickBooks Credit Card Payments streamlines the payment process, making it efficient and hassle-free for both you and your customers. Enjoy the benefits of automated transaction management, and spend more time growing your business.
Securing Payment Information in QuickBooks Online
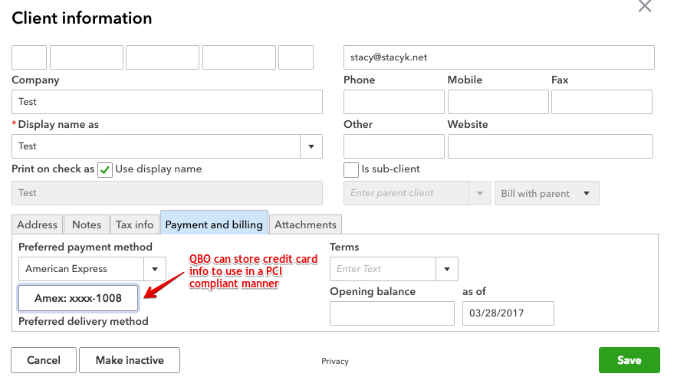
QuickBooks Online, in conjunction with QuickBooks Credit Card Payments, adheres to Payment Card Industry Data Security Standard (PCI DSS) compliance. This means that when you store payment details, all sensitive information except the last four digits is securely masked. You can store various payment methods, including Visa, MasterCard, Discover, and bank routing/account numbers. However, note that only one card or account can be stored for each customer.
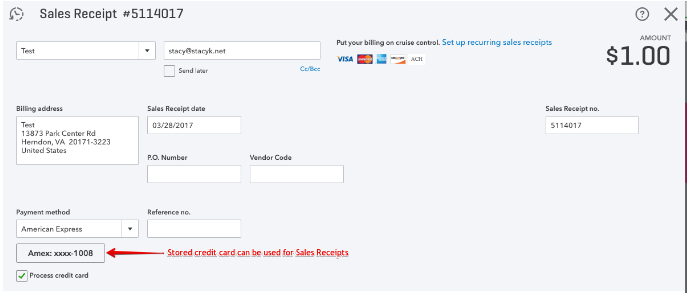
Creating a sales receipt with stored payment information – To leverage the convenience of stored payment information, follow these steps –
- Click the Quick Create button (you can find it at the top of the screen) to get started.
- Select “Sales Receipt” from the options available.
- Fill out the sales receipt form as you typically would, specifying the details of the transaction.
- Now, select the payment method you’ve previously added and stored for the customer.
Automate recurring transactions – One of the remarkable benefits of QuickBooks Credit Card Payments is the ability to automate recurring transactions. Here’s how it works –
- If you have regular sales that follow a set schedule, you can turn a sales receipt into a recurring transaction.
- QuickBooks Online will automatically generate a new sales receipt at the interval you specify.
- With stored payment information, QuickBooks will charge the customer’s card or draft the bank as per the recurring schedule.
- Both you and the customer will receive email notifications, along with transaction details.
On-demand payments – Even if you’re not utilizing recurring sales, storing payment information can streamline the payment process when your customer is ready. Here’s how –
- When the customer is prepared to make a payment, they can inform you that it’s okay to use the payment method on file.
- In this scenario, you would click on Quick Create and select “Receive Payment.”
- Simply enter the relevant information, and the payment will be processed using the stored payment method.

Storing payment information in QuickBooks Online not only enhances efficiency but also provides a secure and compliant way to manage financial transactions. Whether you’re handling recurring sales or accepting payments on-demand, this feature streamlines your operations and ensures a smooth experience for both you and your customers.
Conclusion
Incorporating credit card payments into your business operations is a smart move that can significantly boost your revenue and streamline financial transactions. QuickBooks offers a robust and secure platform for receiving credit card payments, making the process hassle-free for both you and your customers. From setting up your QuickBooks Credit Payments account to securely storing payment information, this guide has covered it all.
By following the steps outlined in this article, you can take full advantage of QuickBooks’ capabilities and enjoy the benefits of automated payment processing, recurring transactions, and simplified payment management. It’s a game-changer that empowers you to focus on growing your business while leaving the financial intricacies to QuickBooks.
Don’t hesitate to explore these features, as they can make a significant difference in your business’s efficiency and profitability. Embrace the convenience and security of credit card payments in QuickBooks, and watch your business thrive.
Also read: When QuickBooks POS Client Cannot Connect to Server
Also read: How to Delete a Deposit in QuickBooks?
Frequently Asked Questions
Is QuickBooks Online safe for storing credit card information?
Yes, QuickBooks Online is PCI DSS-compliant, ensuring that sensitive credit card information is securely stored. The platform masks all but the last four digits of credit card numbers, providing robust data security.
Can I store multiple credit cards or bank accounts for a single customer in QuickBooks Online?
No, QuickBooks Online allows you to store only one credit card or bank account for each customer. However, you can easily update the stored payment information when necessary.
How do I set up recurring transactions for automatic payments in QuickBooks Online?
To set up recurring transactions, create a sales receipt as usual and select the customer’s stored payment method. Then, choose to make the transaction recurring, specifying the interval at which it should repeat.
Can I use QuickBooks Credit Card Payments for one-time payments too?
Absolutely! QuickBooks Credit Card Payments is versatile and caters to both recurring and one-time payments. You can store payment information and process payments whenever your customers are ready.
What fees are associated with QuickBooks Credit Card Payments?
QuickBooks Credit Card Payments typically has transaction fees, which vary based on factors like the type of card used and the payment processing method. These fees are automatically recorded in QuickBooks for your convenience.
Is there a limit to the number of customers I can store payment information for in QuickBooks Online?
QuickBooks Online does not impose a limit on the number of customers for whom you can store payment information. You can securely store payment details for all your customers who opt for this payment method.
How can I access transaction history and manage my QuickBooks Credit Card Payments account?
You can access transaction history and manage your QuickBooks Credit Card Payments account by clicking the “Manage Account” button in your QuickBooks Online account. This will take you to a dedicated portal where you can review transactions, set preferences, and make changes as needed.
What happens if a customer’s credit card on file expires or needs updating?
QuickBooks Online provides options to easily update stored payment information for customers. You can ensure a smooth payment process by promptly updating card details when necessary.
Are there any additional security measures I should take when using QuickBooks Credit Card Payments?
While QuickBooks ensures robust security, it’s essential to educate your team on best practices for data security. Additionally, regularly reviewing and updating your account settings and passwords can further enhance security.
How quickly are payments processed through QuickBooks Credit Card Payments deposited into my bank account?
The time it takes for payments to reach your bank account can vary, but QuickBooks Credit Card Payments aims for a seamless and timely deposit process. You can monitor the deposit status in your QuickBooks Online account.